Thursday, December 30, 2010

Happy New Year! 2011 Video Series Announcement


Happy New Year my crafting friends! I have been thinking about what my video series should be for 2011. What I have decided is to feature one cartridge a month. I know many of you have many cartridges just like me and they never get used!

So, for this new year, I am going to pull out some of my older cartridges and some of the newer ones that I haven't used yet and create my projects from those.

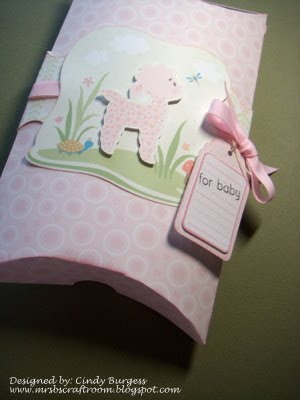
For January I will be using "Birthday Bash". I have 2 grandsons with birthdays in February and I would like to get their cards and birthday layouts ready to go in advance...if you can image that! So I won't be so rushed when their actual birthday arrives....as you can see, one of my new years resolutions is to be PREPARED this year for any special event! We will see how it goes!

If any of you have any special requests for a cartridge, and I have it, I would be happy to feature it during a month. Please leave me a note and I will do my best to feature it for you. Also, if you have a special type of card or project you need help with, let me know and I will try to feature something during the month for you.

I want this blog to be a help to you creating your special gifts and cards for your loved ones...so lets work together and have a BLAST this year!

See you on January 1st with a card using Birthday Bash. By the way, the picture is of me and my Christmas present from my husband! Isn't she cute! Her name is Sugar.

I hope you and your loved ones have a safe and Happy New Year!
Hugs,
CindyB

Friday, December 24, 2010

Merry Christmas!

I hope you and your family enjoy this holiday!

Hugs,
CindyB

Friday, December 17, 2010

My Annual Christmas Cookie Exchange Party

Hi Crafters! Last night, I hosted my annual Christmas Cookie Exchange party! We had a super time! Everyone brought an appetizers and we all exchanged cookies! Here are a few pictures from the event...

This is our group picture, I am on the far left.

This is a picture of the table with all the cookies! Wow! They look yummy!

Here is the Italian Cream Cake I made for dessert!
Each year I make something for everyone to take home, this year I made 2 items. This is a cupcake baked in a mason jar, topped with chocolate filling and white icing. I decorated the jars using PTI stamps and cut the scallop and circle using my Cricut.


The 2nd gift I made is a set of gift tags in a small gift box. The tags were cut with my Cricut and decorated with PTI stamps. The gift box was also cut with the Cricut and decorated with PTI stamps.

I hope you enjoyed a few of my photos from a really fun event!

Thanks for stopping by and have a great day!
CindyB

Saturday, December 11, 2010

Episode 20 - Christmas Tree Card


Hi Crafters! Well, I have had a busy week, and next week will be just as busy...but I wanted to get my Christmas cards completed this weekend.

This Christmas card is made using my gypsy and my Imagine. The video is a little long, but I wanted to show you a technique to flood fill an image when using your gypsy. I hope you enjoy!


You can find the gypsy file Here

Thanks for stopping by today and have a wonderful weekend!
Hugs,
CindyB

Tuesday, December 7, 2010

MIA for a few days!

Sorry, I am going to MIA for a few more days. I have taken a new position at work and I am traveling quite a bit. I hope to have something to post this weekend! Thanks for your continued support of my blog!

Hugs,
CindyB

Thursday, December 2, 2010

Someone stole my wreath off my front door!

Can you believe it! Someone stole my wreath right off my front door last night! So, if you make the holly wreath in my previous post, watch out! You need to put under lock and key!

Apparently it is in high demand!

I live in a really safe neighborhood and my house was all lite up last night with Christmas lights! I just can't believe someone would do that!

So now I will have to make another one! I'm not sure if I have the time, but I loved it so much...I will have to just make the time!

Hugs,
CindyB

Friday, November 26, 2010

Episode 19 - Holiday Wreath

Hi Crafters! Well, I am finally back...I have just been so busy these past few weeks...hopefully things will get a little less crazy.....anyway, today I am kicking off my Holiday series..creating Holiday Home decor and other items for you.

Today's project is a Holiday Wreath. I originally saw this idea on one of the Custom Crops video's which you can view Here.

I decide to expand on their idea a bit, and create a gypsy file for ease of cutting and also adding a score line to each holly leaf. Adding the score line really save a lot of time, by not having to score each leaf on a score board.

So...here is the video..its a bit shaky as I held the video camera most of the time..., hope you enjoy!


You can find the gypsy file Here

Have a wonderful weekend!

Saturday, November 20, 2010

Oh, a very long week

Hi crafters! Well, as you see, I don't have a project today! I have been in Las Vegas all week on a business trip. I am really ready to play this weekend...so I should have something to share very soon.

Hope you all are having a wonderful start to your weekend!

Hugs,
CindyB

Saturday, November 13, 2010

Christmas Card

Hi Crafters! Well, today I don't have a video! I know 2 weeks in a row!!! I have been super busy at work, matter of fact out of town most of this week...and I will be out of town next week also....but I wanted to have something for you to view this weekend! So here is a card I made using the Christmas Card cartridge and Winter Frolic.
The card base is cut at 4.00 and the layer is cut at 3.85, both are from the Christmas Card cartridge.


The Tree is from the Winter Frolic cartridge, and cut at 3.12. I cut the shadow and the layer at the same size. The oval is also from the same cartridge, it is cut at 13.00 ( this is so large because it is a layer on this cartridge) If you use a oval from another cartridge, then the size wouldn't be as large.

I inked around the edges of the layer and oval and added some bling to the christmas tree.
The sentiment stamp is from Papertrey ink.

If you would like the Gypsy file you can find it Here

Have a wonderful weekend!
Hugs,
CindyB

Wednesday, November 10, 2010

CJToo DT project - Thankful

Hi Crafters! Today is another fantastic day over at CJToo's!

This is a Thanksgiving Day page layout that I plan to use this year. The theme this week is Thankful, and I am Thankful for my family.


The paper for my layout is from DCWV The Autumn Splendor Stack.
I am using the Thanksgiving cartridge, cutting the pie at 2 3/4 and the cornucopia at 2 inches, and the words Gather Together is cut at 3 inches .

The large square scallop is cut at 11 inches using the Storybook cartridge.

Make sure you stop by CJToo's blog and check out the other DT members!

Have a wonderful day!
Hugs,
CindyB

Monday, November 8, 2010

Peachy Keen Challenge

Hi Crafters, today I am sharing my page layout for the Peachy Keen Challenge this week!
Isn't that Santa soooo cute!!!!!!!


I am using Papertrey Ink's new Christmas paper for my layout. The Santa Baby is cut from my Cricut using the Wild Card cartridge and that cute little Santa is from Peachy Keen! I added some 3d snow embellishments to the fur on Santa, but I'm not sure you can tell by the picture.

The snowflakes are punched from a MS punch, and the ribbon I purchased at Michaels...it matched the paper so well! Love that!

Thanks for stopping by today and have a wonderful week!

Hugs,
CindyB

Saturday, November 6, 2010

Thankful Banner

Hi Crafters! Well I am not going to have a video for you today...it has been a very busy week for me and I just didn't get time to make anything new.

But, since we are close to Thanksgiving, I thought I would re-post a post I did last year about this time on a Thankful Banner I made.

I made this banner last Thanksgiving and I have just pulled it out of storage and hung it up again this year! I LOVE when that happens!

So...here is the banner and a few details....


For this banner, I used my Gypsy (of course) and used a cut from WinterWonderland cart for the banner base. I cut it at 8.19 height and 5.18 width. I used the layer feature on the Gypsy, so on page 1 of the mat, I copied the banner base 3 times to make 4 on a 12x24 mat. Then to make the shadow, I created another mat layer, copied the banner base to the 2nd mat and started enlarging to create a shadow. I ended up with a size of 8.53 height and 5.60 width, and cut 4 on the 12x24 mat also.

For the letters, I used Storybook cart and cut both the letter and the shadow of each letter, they were cut at 5.20 height and 3.22 width.

I cut the leaves on the end of the banner from the gypsy wanderings cart, cut at 3.86 height and 3.94 width. The acorn is from the Doodlecharms cart cut at 4.29 height and 5.12 width. The leaves in between each banner base is also from the Doodlecharms cart cut at 2 inches.

I took the letters and stamped a flourish on each letter using my glue pad and added some MS glitter to brighten them up! I then layered them together and applied to the banner base.


I punched holes on the upper portion of each side of the banner base and tied a ribbon to each to bring them together. On each ribbon, I added the little leaves that I had distressed with brown ink. I also distressed the leave and acorn on the end of the banner.

Well, I'm off to more decorating! Thanks for looking and have a wonderful day!

You can find the gypsy file Here

CindyB

Thursday, November 4, 2010

Christmas Gift Bag - post for Thebugbytes!

Hi Crafters! Well, today I am designing on Thebugbytes! Thank you Pam for giving me another opportunity to share with your followers!

Well, since the theme for this month is Christmas, I thought it fitting to start creating some gift bags for the Holiday season.


This is a gift bag with a mitten embellishment. Super simple to make... Hope you enjoy!


Thanks for stopping by and have a wonderful day!
Hugs, CindyB

Saturday, October 30, 2010

Episode 18 - Treat Bags

Hi Crafters! Well, Halloween is just 1 day away! So I decided to create some super easy treat bags to hand out to my little goblins!

I am using George and Basic Shapes cartridge and Gypsy Wanderings to cut out the bags and I am using stamps from Peachy Keen and Scrappy Moms.


You can find the gypsy fileHere


I hope you and your family have a safe and fun Halloween!
Hugs,
CindyB

Thursday, October 28, 2010

Some other things I have been doing!

Hi Crafters! I thought I would share with you some other projects I have been working on.

I have started painting, at the encouragement of my BFF Linda.

I started collecting old metal trays from the local thrift store and started making some christmas gifts by painting on them.

I have finished 3 so far, I hope to get a few more completed before christmas.

This is the first one I completed...I love this Santa!

For this one, I found this really cool wood plaque that had a really ugly painting on it, so I decided it needed a couple of cute gingerbreadmen on it instead! So this is what it ended up as....


And this is the 3rd one I have been working on..I have to say, this one was the most difficult! But I love it the most! I am not giving this one away! I am going to keep this one and use in my kitchen at Christmas...


Well, I hope you enjoyed my little break from papercrafting! I am off to paint a few more trays!

Have a great day!
CindyB

Wednesday, October 27, 2010

CraftJunkieToo Project - Halloween is in the Air!

Hi Crafters! Today is my 2nd project for CraftjunkieToo's blog! This week we are focusing on Halloween and the theme is "Halloween is in the Air"!

We were challenged to make something that could be hung on a door, window, doorknob, etc. for Halloween!

Soooo, I decided to make a door hanging for my front door for Halloween night! (I also could put this on my 15 year old son's bedroom door, I am afraid to go in there also!)

For this project, I am using the Happy Hauntings cartridge. I cut the frame with the spiders using the "fit to page" function. I cut the frame base from cardstock and chipboard. I adhered the cardstock to the chipboard using a wet glue.

I cut the frame from coordinating designer paper and adhered that to the frame base.

I cut the words from the same cartridge cut at 8", I cut the layers and the shadow for the words.

For the spiders, I add some Martha Stewart black glitter to make them sparkle! I also added a few little round black rhinestones on the scrolls of the frame.

Make sure you stop by CraftjunkieToo and check out the other design team members projects! They are awesome this week!

Thanks for stopping by, and have a wonderful day!

Hugs!

CindyB

Monday, October 25, 2010

Club Ruby

Hi Crafters! If you haven't checked out Club Ruby yet, what are you waiting for?

Club Ruby offers a monthly kit, fabulous inspiration and a wonderful community of crafters! I can't post the projects I have designed for the club, but I can give you a few peeks!


Come check us out!


First Months kit:


3rd months kit:


As a designer, I have just received the 4th kit, and all I can say is "Wow" Megan and her team have out done them selves this month! The kits just keep getting better and better!


If you haven't heard of Club Ruby, make sure you stop by and check us out! You will be glad you did!


Have a great day


CindyB

Saturday, October 23, 2010

Episode 17 - Pumpkin Patch Layout

Hi Crafters! Today's I am making a page layout from my trip to the local pumpkin patch with my grandchildren.

I had so much fun with this layout! I am using the Opposites Attract, Old West, Doodlecharms and Paperdoll Dress Up for this project.

I hope you enjoy!


Thanks for stopping by today and have a wonderful weekend!

CindyB

Thursday, October 21, 2010

Playing with the Imagine

Hi crafters! I have been playing with my Imagine this week and thought I would post a couple of cards I have made.

This card was made using 2 Imagine carts and Just because Cards cart. I selected a card base from Just Because Cards and flood filled the image with the paper from Better Together cart.

The cute little girl and her dog is from Better Together also. Then I switched to Hopscotch cart and still using the Just Because Cards flood filled the tag image with the cloud paper from Hopscotch. I then switched back to Better Together cart and flood filled a scallop border from Just Because Cards.

I sure hope the gypsy will be able to assist me with this type of creations in the future...it sure would make it easier!

For my 2nd card, I am using Imagine More Cards cart. I cut the card base and the roses, tag and roses from this cart. This is a really neat cart, as it has different card bases that you can change the colors on...to make your own custom card.

I added some stickles to the roses to add some interest and bling! The stamp is from Papertrey Ink as well as the ribbon.

I hope you enjoyed these cards, thanks for stopping by and have a wonderful day!

CindyB

Friday, October 15, 2010

First project for CraftJunkieToo and Episode 17 - Turkey Day

Hi Crafters! Well, today is a REALLY special day! I have my first project post as a design team member for CJToo!

Since I normally do a video on Saturday, I thought I would combine the two this week. I hope you enjoy!

Today we are making some Thanksgiving Holiday decorations. I wanted to create a really fun centerpiece for my table and thought the turkey from Create a Critter was just perfect! And then I thought, hum...I need some napkin holders also! So I created those with the same cut from Create a Critter.

I think they turned out so darn cute, I hope you feel the same way!

They were very simple to make, and since I used my Imagine this week...there isn't a gypsy file (the gypsy doesn't communicate with the Imagine yet), but I think you can all make this project with no trouble at all!

So...here are the videos explaining how to assemble this fun project..


I decided to add the Gobble Gobble (also from the Create a Critter cartridge) after I finished the video. It was very simple, I cut the Gobble Gobble 2 times once at 2 1/2 inches and once at 2 inches.


Since the phrase doesn't have a layer, I created my own using the idea shared by CJtoo a few weeks ago on her site. It was VERY easy! I also attached a dowel stick to the back of the word phrase so it would stick out of the turkey table decoration. I did end up putting styrofoam inside the box of the turkey table decoration so I had something to stick the sign into.

I hope you have enjoyed this project!

Thanks for stopping by and have a wonderful weekend!


CindyB

Monday, October 11, 2010

Imagine projects

Hi Crafters! Today I am sharing a couple of projects that I have submitted to Tammy at Creative Critterz Imaginations Design Team call. I am sure there will be a lot of really fantastic projects sent in...so I hope I have a chance!

This first project is a layout I made using the Imagine More cartridge.

This 2nd project is made from Nursery Tails cartridge and the pillow box is from the Wedding solution cartridge. Wouldn't this be so cute with a matching onsie with the same image ironed on? I am off to Walmart this week to find one and I will post the picture once I get that project completed.....


I really am loving the new Imagine! My projects just seem to come together so quickly with this machine! I can't wait for the gypsy update, this will open up so much more creativity!

Thanks for stopping by today! Have a wonderful day!

CindyB

Great News!!!

Hi Crafters! I have some great news to share with you today! I have been selected to be on CraftJunkieToo!'s design team!

I so soooooo excited!!! I have been following Tracy for quite a while and really love her style! Besure to check her out and the other new Design team members! They are really awesome!

I will have my first project on Friday, so be sure and check back!

Have a wonderful day!
CindyB

Friday, October 8, 2010

Episode 16 - Boo to you!

Hi Crafters! Oh my, I have a really fun project this week! Have many of you seen the "You've Been Booed" gifts that go around during the Halloween season? Well, I have a fun twist on this Halloween tradition. Normally you would leave a little basket or treat bag at a friends door, but I thought how fun would it be to make a hanging treat bag to hang on their door instead!

So, that is what we will be making this week, and hanging "Boo to you" treat bag. Hope you enjoy!


Here is my finished project! I also added the little poem that goes with this treat, so you can pass it on to another friend when you recieve it.


You can find the poem Here

and you can find the gypsy file Here

Thanks for stopping by today and have a great weekend!

CindyB

Saturday, October 2, 2010

Episode 15 - Halloween Layout


Hi Crafters! I am here today with another video in my cricut and gypsy video series. Today I thought I would make a halloween page layout. I still need to finish scrapping my halloween pictures from last year, and here we are...another halloween is upon us! So I better get movin!


Here is the final layout! I ended up adding an extra ghost and I added some eyes to the word Spooky!


Thanks for stopping by and have a great weekend!


CindyB

Thursday, September 23, 2010

Episode 14 - Witch door hanging

Hi Crafters! Today is Episode 14 in my Cricut and Gypsy video series. Today we are making a
Witches door hanging.

I have to say, I didn't think up this idea, I saw Christina over at Creations with Christina where she
made a really cute Halloween door hanging. So I thought I just have to make one! So here is my
version.

I hope you enjoy!


Sorry for the length of the videos! I just couldn't shorten any and still give you all the directions needed.

So here is the finished door hanging! I love how it turned out!

If you would like the gypsy file you can find it Here

Thanks for stopping by today and have a wonderful week!

CindyB

Posted by Picasa

Wednesday, September 22, 2010

1st layout with Imagine

Hi Crafters! Well, today I created my first layout using my new Imagine!

I am using Nursery Tails....I LOVE this machine! I was able to pull out some images from
a variety of different cuts and they all coordinated so beautifully!


Sorry about the lighting.....not my best photo work... but I wanted to get this posted.

Thanks for stopping by and have a wonderful day!

CindyB
Posted by Picasa

Tuesday, September 21, 2010

Peachy Keen Guest Designer and Project Tuesday!

Hi Crafters! Well, today is a very exciting and busy day for me! I have 2 projects to share with you!


1st up, I am the Guest Designer over at
Peachy Keen Challenge Blog! Don't you just love the Peachy Keen Stamps! I sure doooo!

Here is my sample for their challenge this week....


For my card, I am using Kraft cardstock for the base of the card and SU Bashful Blue and PTI christmas prints from 2009. The stamp I am using is the Gingerbread man from Peachy Keen. I LOVE this little guy! I host a cookie exchange every Christmas and use the Gingerbread man as the theme to my party every year. I am very partial to him!


I hope you stop by the Peachy Keen Challenge blog and check out their DT samples! They are really awesome! As aways!


Now to my 2nd project today....

today we have a new project at Project Tuesday


For my card today, I am using SU designer paper...I don't remember the name of this pack as it is a few years old. I cut the flower from Forever Young cricut cartridge sized at 3 inches. The cardstock is from SU.

Make sure you stop by Project Tuesday and pick up the directions for making this fun pocket card.

Thanks for stopping by and have a wonderful day!

CindyB

Saturday, September 18, 2010

Episode 13 Pumpkin slider card

Hi Crafters!!! Happy Saturday....today I have another video in my video series using the Cricut and Gypsy..I am making a Pumpkin slider card.

I made a cupcake slider card a few weeks ago, and I just loved it..so I thought I would try the same technique with some other images...I think this one turned out just as cute!

What do you think?


I added a little black bow on the top of the pumpkins head..it just looked to plain for me..


If you are interested in the Gypsy file, you can find it Here


Thanks for stopping by and have a great weekend!


CindyB